My favourite tools for blogging
Following my post of my favourite tools, I was asked by a fellow colleague to share my blogging tools.
I actually blog regularly in three different places. You can read me here, in my company’s blog or writing for Startup Grind.
Since Startup Grind has got a tool of their own to publish content, I will not be covering it here. Instead, I will focus on what I use when I blog for MarsBased or for my personal Medium account.
Depending on your needs, you might want to go for an existing blogging solution such as Wordpress or Blogger, or build a blog of your own. Because I don’t have a dog in the fight of which one is better, I won’t be giving the pros and cons of each one. Instead, I will tell you how to use each one.
Build your own blog: Jekyll + Sublime
At MarsBased we used Jekyll to create our website. Jekyll is a Rails-powered static site creator, which in non-nerdy language translate to “create a website using plain text and no databases”. If you’re interested in reading more about it, take a look here.
When you load a Jekyll project in your text editor of choice, it creates a hierarchical structure of your site. In my case, I use Sublime text: a really useful text editor with loads of plugins to power it up — very popular among developers.
In the Jekyll project structure there are some folders, but what you need to know here is that files included in the _posts directory will be published as a new blog entry once the site is pushed live, provided they follow certain rules:
- Posts must be named year-month-day-title.md or year-month-day-title.markdown
- You need to fill in the parameters in the top part of the file (layout, title, date, etc.)
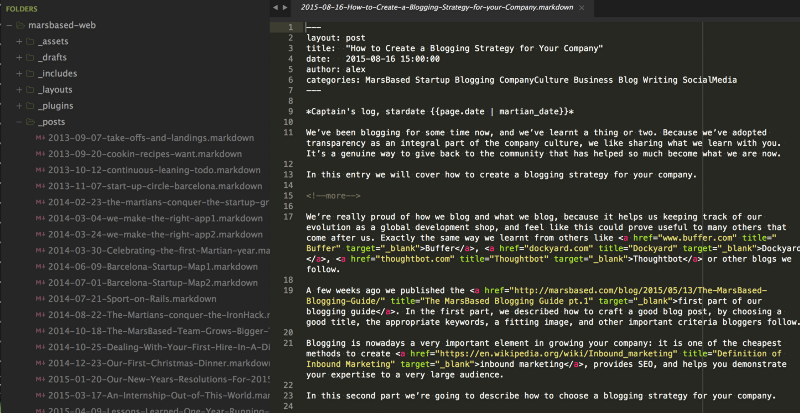
As you can see, there are some parameters and HTML, so if you’re not into coding, you will need to learn some concepts. However, it’s very straightforward and easy to learn for non-technical people.
It’s wonderful how the content in the screenshot above translates into a full-powered blog like ours.
Use an existing blogging platform: Medium
Simply put, Medium is THE tool for writing. It is simple, beautiful and straightforward: perfect for distraction-free blogging.
Medium focuses on content. Once you sign up, you’re prompted to write right away: no plugins, no setup, no look&feel tweaking, no nothing. That’s why I chose it over Wordpress.
Your story will look beautiful from the get-go.
Medium also offers some insights on whether you’ve got followers or not. One thing I really appreciate is the stats screen.
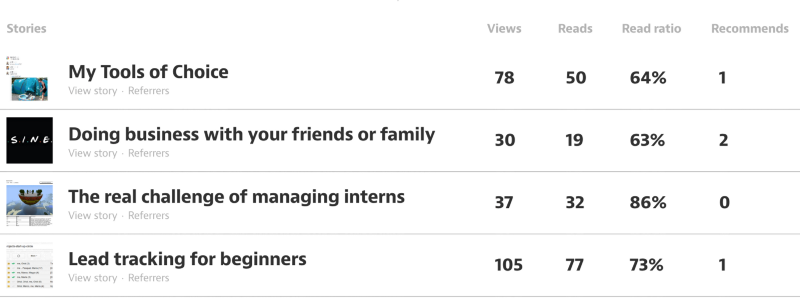
No complex analytics stuff, no setup. Just simple stats for human beings: how many people read your article, how far did they read into it, and how many people shared it through their recommendation system. Simple.
Another advantage for beginners is that Medium provides an user base. You can start building your own fanbase before you migrate your own blog elsewhere.
Last, but not least, you can use Medium to complement your regular blogging platform. For instance, I created a Medium account for MarsBased to test our blog posts on this platform. I repost all our posts there to see whether our audience behaves the same way as on our website.
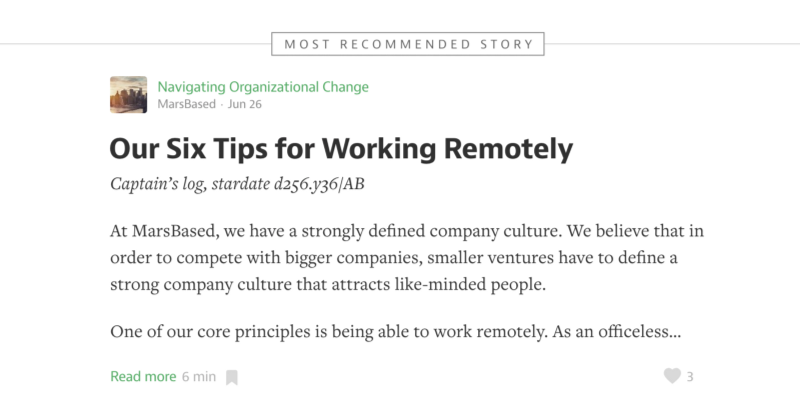
For instance, one of our best posts had a lot of views, and we received a request to add it to one Collection. Collections are compilations of related content from multiple authors on Medium.
Navigating organizational change included our post about our tips for working remotely.
Scheduling: Trello
I use Trello for everything. Trello is my tool of choice to organize and plan what I need to do.
Trello is actually a list-based task-managing tool. It’s very common among developers because it’s based on GTD methodologies so you can see the real status of a task/sprint/project in a glimpse.
It can also be used for non-technical projects: normal people (as in non-developers) use it to plan their holidays, their wedding, or what-have-you. 200 At MarsBased we use Trello to manage our projects, our selection processes, our relationships with other companies and many other things. Since I am in charge of the blog, I also keep a board with our writing schedule which looks like this:
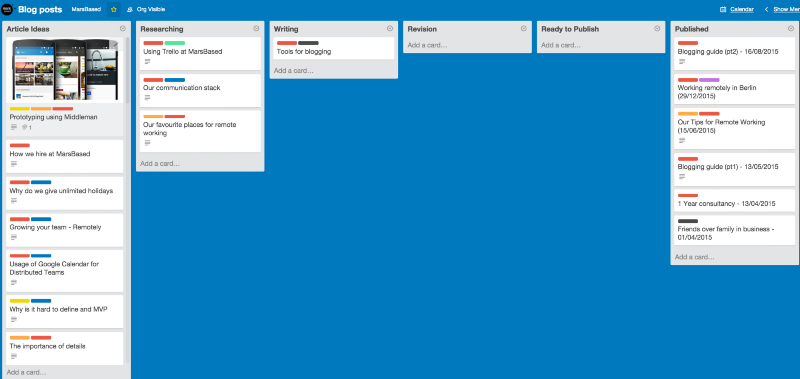
As you can see, I add all the ideas I’ve got to the Article Ideas list, which move promptly to the next lists as soon as they’re ready to go into the next stage (researching, writing, revision and so on).
You could create a simpler board with less states, but basically I use the following:
- Article ideas: Include any idea you’ve got here to come back to it later. The higher on the list a it is, the more likely it is to be dragged onto the next stage.
- Researching: I try to have the next two or three blog posts here. It helps me start reading about the topic or collecting the information I need (links to other articles, references, quotes, etc.).
- Writing: Ideally you will not have more than a post here.
- Revision: I drag the post here when I submit it to my team-mates to get their feedback. Specially useful if your team has a revision workflow or it it’s being spell-checked by someone else. The 99% of the post is done, you’re just adding details, formatting, adding the cover image, etc.
- Ready to publish: When the post is ready but you don’t want to publish it just yet. For instance, we try to publish on Monday, so if I finish the post by Thursday, it’ll wait here. You can also write posts for special days and leave them here with a due date (Anniversary, New Year’s, April Fools, etc.)
- Published: Once a post enters this stage, it means it has already been published. You can get rid of this stage, but I use it to keep track of our history, by adding the date I published every post in the title of the card.
Inside the cards, you‘ve got even more options to help you organise. Let’s cover the most important ones:
- Labels: Useful to filter when you want to get a really quick overview of the whole board. Due date: Get reminders to get your writing done. Useful if you’re working with other people.
- Assigned to: Important if your team has more than one writer.
- Description: Use this to include an outline of the post, references or generally just braindump all you want to write here to get back to it later.
- Attachments: Use them to save the images or files you need to link.
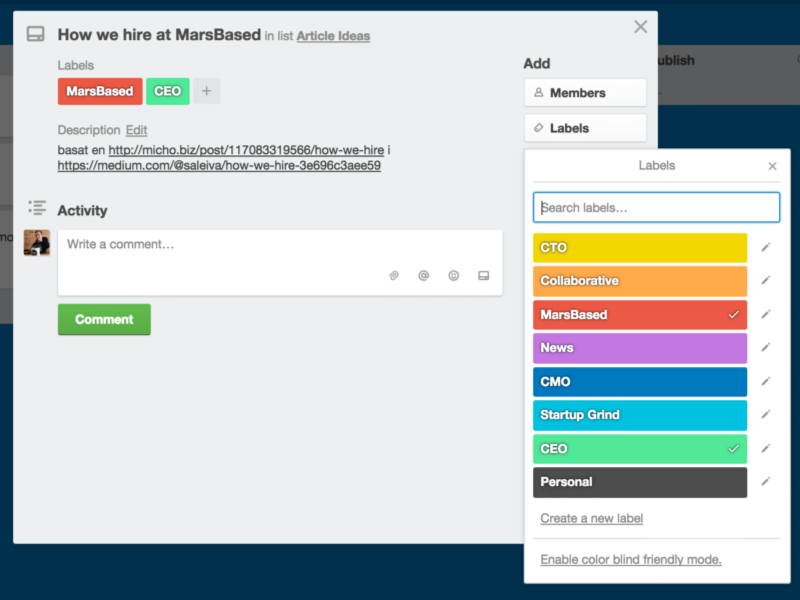
As for the labels, let me explain it a little bit better: I’ve got some labels that indicate where does that post go (Startup Grind, this Medium or the MarsBased blog), there’s another one that indicates that the post is a collaborative one (like this one) and the other labels — CTO, CMO, CEO — indicate who is the target reader for each entry. This helps me defining the language level and the topic I should cover.
Wow! That was a long post! Thank you for reading! Let me know if I have skipped something important. Also, feel free to share your tools or techniques with me using the comments section below.
This post was originally published on Medium on 2015-08-22: My favourite tools for blogging.